Showing posts with label RWD. Show all posts

Monday, September 5, 2016

Yokomo YD-2 PLUS Unboxing and Initial Impressions

Yokomo YD-2 PLUS Unboxing and Initial Impressions

A look into Yokomo's purpose-built RWD-drift chassis, part 1.

I purchased a Yokomo YD-2 PLUS chassis kit last Tuesday from my local RC drift shop, Kong RC Drift in Lynnwood, WA. I waited for the PLUS to be released instead of picking up either the standard or the gyro-package as the PLUS came with several key upgrades that I was planning on purchasing anyways. I was able to make good progress on building the chassis yesterday, but let's first take a look at the box and its contents.
Pictures:

Box - The box is the same as the regular YD-2 box, but has a "PLUS" sticker on it. It follows the YD-4 box as being closer a shoe-box in shape, as opposed to the older shirt-box shape that the DIB and DPR came in. This allows you to store your chassis in the box with some adjustments. 


Manual - Comes in English. If you manual doesn't come in English, you can download one form the Yokomo website for your YD-2.


Parts List & Setting Sheet - I recommend making a bunch of copies of the setting sheet, writing down the stock settings on one of them (so you don't have to flip through the manual), and keeping a record of your changes.


Body Catalog Sheet & YD-2 Stickers - The body catalog is great for looking up part numbers of the light buckets and wing parts. For example, the HKS Hyper Silvia S15 comes in SD-HKSSA for the complete D1GP body, SD-S15LA for the light buckets, SD-HKSB for just the body, and SD=HS15W for the wing.


Bottom Chassis Plate - Your friendly carbon fiber chassis plate. This is one of the parts that makes the PLUS a PLUS, but is available separately.


Bags 1 & 2 - These contain your ball ends, steering parts, inner aluminum suspension mounts (PLUS parts), and plastic supports.


Bag 3 & 4 - These contain your gear differential, your gearbox, and drive components. Many of these parts are shared with the YZ-2 and B-MAX.


Bag 5 & 6 - These contain your servo saver and mount, plastic wheel hexes, and suspension tower components. The plastic suspension blocks will not be used in the PLUS.


Bag 7 & 8 - These contain your front suspension upper and lower arms, front aluminum suspension block (PLUS part), knuckles, drive shafts and other suspension goodies. Pay attention to the ball ends so you don't try to use a 4.3mm ball end where you want to use the king pin ball end.


Bag 9 & 10 - These contain your rear suspension arms, aluminum rear suspension block (PLUS part), and SLF Big Bore dampers (PLUS parts).


Bag 11 & 12 - These contain your bumper support, body posts, rear diffuser (different from the YD-4s), battery holders, battery foam, and carbon upper deck (PLUS part).


Misc Stuff - Bumper, antenna wire tube, bag of small tools, and instructions on how to install your gyro.

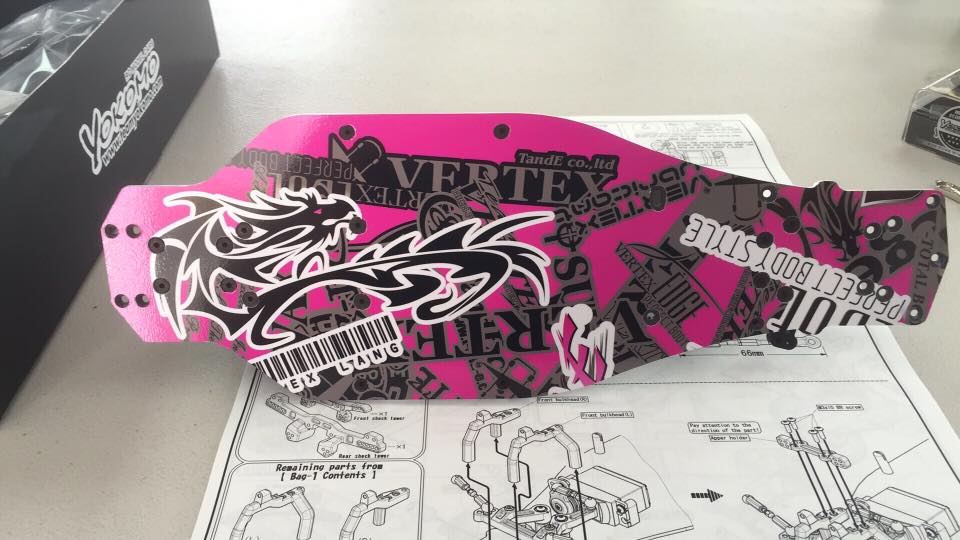
Overall Initial Impression - Overall, I am really impressed with the ease of building this chassis. I was able to install everything through bag 9 in about 4 hours (see bottom picture), despite tracing, cutting, and applying a custom vinyl chassis protector (see first picture), hanging out with friends, and driving on the side. For a first-time driver, any of the YD-2 chassis would be a great start as there's nothing tricky or crazy about the instructions. The steering is smooth but precise despite its plastic arms, and has a wonderful amount of lock. I've thought about replacing the battery holder with the DRB's, but I believe that require drilling additional holes in the chassis plate. The chassis is definitely biased towards the rear with majority of the weight being the battery and motor.

Future Plans - I'll be installing a 8.5t Yokomo Racing Performer motor (currently mocked in place) along with their BL-RS3 brushless ESC. The servo is a Yokomo SP6099 mounted in a pink Usukani servo mount. The only other non-stock part I have installed currently are Yokomo D-165 RWD front knuckles (with the YD-2's front axles).


If you have any questions, please don't be afraid to comment.

Sunday, May 22, 2016

Yokomo DPR Hamachi-Style, part 2.

Yokomo DPR Hamachi-Style, part 2.

A parts breakdown of Hayato Yoshiba's 2WD setting sheet.

This is Hayato Yoshiba's setting sheet for a Type-C w/ the D-162P 2WD conversion installed:
As you can see, it is designed for Yatabe Area, which is an indoor asphalt track with medium traction. My local course in also indoors, but is a polished and sealed concrete floor, so there will be some difference. However, I would like to start with this setting for the DPR and go from there.

Parts Lists

In addition to obvious parts from the D-162P conversion kit, there are parts used but not included with either the DPR or Type-C. Some of these are minor, such as wheel or suspension block spacers, while others are more substantial, as new suspension arms or steering blocks. Here are the parts that I will be purchasing as I do not need a complete 201 kit:
  • Front Suspension Parts (for the DPR)
    •  D-163 Aluminum Steering Bell Crank for 2WD Drift Conversion PRO/RS 201
    •  D-164 Aluminum Front Lower A-Arm fro 2WD Drift Conversion PRO/RS 201
    •  D-166 Aluminum Front Steering Block for 2WD (L/R)
    •  D-171G Progressive Drift Spring 1.3x9.5 turn (Green)
    •  SD-300S Aluminum Suspension Mount Spacer*
    •  ZC-A36## Aluminum 3.0 x 6.0 x ## Spacer (Blue)**
      • 2x A3620 for the bell cranks
      • 2x A3620 for the steering block upper king pins
      • 2x A3630 for the steering block lower king pins
      • 2x A3630 for the front front suspension block (FF)
      • 2x A3620 for the front rear suspension block (FR)
      • 2x A3615 for the front rear suspension block (FR)
  • Rear Suspension Parts (for the DPR)
    • D-026 Aluminum Rear Shock Tower
    • D-171G Progressive Drift Spring 1.3x9.5 turn (Green)
    • RR1.0 Suspension Block***
    • SD-008HG Graphite H.D. Lower Suspension Arm
    • SD-415G10 Graphite Rear Hub Carrier (Toe-in 1.0)****
    • SD-501DS or SD-501 DA Ball Differential
    • ZC-A36## Aluminum 3.0 x 6.0 x ## Spacer (Blue)
      • 2x A3610- for the rear front suspension block (RF)
      • 2x A3630 - for the rear rear suspension block (RR)  
    • ZS-011EL Aluminum Light Weight Wheel Hub
* You don't need to purchase these as the spacers used for the rear suspension blocks are not used and you can use them for the front suspension blocks.
** The DPR comes with spacers for the suspension arms, but the 2WD arms are not as wide as the stock ones, hence the 3.0mm spacer in the front and the 3.5mm worth of spacers in the rear.
*** I'm not sure what block is used as Yokomo does not offer a RR1.0 block.
**** The rear hub carriers are swappable so they can either be a 1.0 toe-out or a 1.0 toe-in block. Flipping the blocks and using them with the stock RR2.0 rear suspension mount results in a 1.0 degree rear toe-in.


Saturday, May 21, 2016

Yokomo DPR Hamachi-Style

Yokomo DPR Hamachi-Style

Summertime and the drifting's easy...

With the YD-4 completed for now with the exception of fine tuning and summer fast approaching, I thought I would pick up a chassis for outside (asphalt) driving. Initially, I thought about picking up a Yokomo Drift Package Type-C and the Yokomo PRO 201 2WD Drift Conversion (D-162P). However, Banzai Hobby was running a ludicrous sale on the DPR ($319 before shipping!). For all those who aren't familiar with the DPR, it is Yokomo's ultimate shaft-driven drift car, with much of the aftermarket parts already available for the Drift Package series included. For instance, the only two parts in the PRO 201 2WD conversion kit that the DPR doesn't already include are the steering arms and the lower suspension arms.


A week after placing my Banzai Hobby order, the following items arrived, with the exception of the gold Overdose differential case, which was a spare from my FR-D build:
  • Yokomo DPR
  • Yokomo BL-RS3 ESC & 10.5T ZeroOne Motor Combo
  • Yokomo 32T Pinion Gear
  • Yokmo Digital Low Profile Serv
  • Yokomo YG301 Gyro
I plan on picking up the two parts from the PRO 201 kit I do not already own in the near future, but this is going to be my slow build, focusing primarily on Yokomo parts and borrowing heavily from Hayato Yoshiba's setting sheet. My next post will be a breakdown of all the parts mentioned in the setting sheet.

Sunday, May 15, 2016

Yokomo YD-4 RWD

Yokomo YD-4 RWD

Construction Complete

I finished assembling the YD-4 in accordance to the supplied instruction, gave it a thorough examination, and promptly converted it to RWD with part from my local RC drift store. The chassis showed a lot of promise for RWD, with Drift Package-compatible gearboxes and 3mm suspension hinge pins.The slide rack is stable and provides for precise setting of Ackermann geometry.

Here are the aftermarket parts I used to convert the YD-4:
  • MST HT Aluminium Front Lower Arm Set  (Purple)
  • MST FXX Adjuster Set 5.8 (4)
  • Usukani KPI Knuckles (Black)
  • Wrap-Up Next 0148-FD Aluminum KONDO Custom HD Upper Arm (Black)
  • Yokomo IB-414KBC (Black)
I was going to go with the Wrap-Up lower arm to match the upper arms, but decided that a little color would be nice on this otherwise all-black chassis. The MST FXX Adjuster Set is my go-to for king ball attachment as they are easy to adjust and do not require pliers to install the ball caps. However, you have to take care to not tighten the screws that hold the little cap in place or else you'll cause the king ball to bind. Usukani knuckles are cheap and cheerful.

Here's a picture of the final product with drivetrain & electronics installed:

  • Motor: Yokomo Zero 10.5T
  • ESC: Yokomo BL-RS3 +Turbo
  • Receiver: Futaba R204GF-E
  • Servo: PowerStar PL-1207 LV Brushless Digital Servo
  • Gyro: PowerStar PS-755 High Stability RC Car Gyroscope
I have a pretty basic core electronics package that I used with all my chassis. Other folks might like Accuvance, but I personally can't justify the price of their ESC and motors over the Yokomo equivalent and I doubt I'm the level of driver who could. So I stick with my Yokomo Motor/ESC combos and try to do the best I can.

Normally I use a Futaba digital servo and D-Like gyro, but Kong had a shipment of these PowerStar items arrive the week before I purchased the YD-4 so I decided to give them a shot. The owner has them in his highly customized Drift Package as well.

Now, I just need to take her out to the track and see how she handles. One thing you'll notice is that the front dampers are mounted upside down. :p

Thursday, April 21, 2016

Yokomo YD-4 Unboxing and Initial Impressions

Yokomo YD-4 Unboxing and Initial Impressions

A look Yokomo's most recent drift chassis, part 1.

I purchased a Yokomo YD-4 chassis kit on Tuesday from my local RC drift shop, Kong RC Drift in Lynnwood, WA. The owner received a shipment of them earlier in the year, but since I've been busy with my DIB275 and FR-D, I've held off on purchasing one. Now that both of those chassis are either running or almost running, I thought I would purchase a YD-4 and take a close look at Yokomo's latest drift chassis.

Pictures:


Box - The "EURO SPEC" sticker refers to the inclusion of the Rear FCD x1.5 axle. The JDM spec model has a Rear FCD x1.3 axle instead.


Bag no. 1 (Front) - Shocks, suspension mounts, and wheel hexes. These parts are injection model fiber(?)-reinforced plastic from what I can tell. I was hoping that they were aluminum at this price point.


Bag no. 1 (Rear) - The damper bodies are also molded in plastic. I probably will swap these out for some BD7 dampers as I prefer aluminum dampers.


Bag No. 5 (Front) - Contains axles, bearings, carbon upper deck, gears, and drive shafts.


Bag No. 5 (Rear) -


Bag No. 10 (Front) - Bearings, servo saver, shock towers, steering knuckles, suspension arms, suspension pins, and tools.


Bag No. 10 (Rear) -


Bag no. 13 - Rear Diffuser.

1.5x Countersteer Rear Axle Bag (Front) -


1.5x Countersteer Rear Axle Bag (Rear) -


Carbon Fiber Chassis Plate (Rear to the Right) - 


Bumper, Antenna, and Shock Oil (350 and 450) - I won'd be using the antenna tube as my Futaba receiver uses an internal antenna.

Thoughts:

My initial opinion is that Yokomo released a product that fits its pricepoint. I would have liked to see aluminum suspension blocks and dampers, but comparing this with a DPR that has those features included increases the price by a couple hundred dollars. The chassis is designed for CS and the front suspension arms have reverted to the H-arm style from the Type-C's Y-arms. This will mean that converting it to RWD will be a bit more difficult than a Type-C due to additional parts being required, but I've seen it done.

What I want to do next is unbag all the parts to examine them so I can determine aftermarket or replacement part compatibility. From what I've seen of the chassis in person, read on Yokomo's product page, and found in the manual, there seems to be several "donor" designs that provided parts and ideas for the YD-4. So stay tuned and I hope to have more about the YD-4 this weekend.

Sunday, March 27, 2016

Wrap-Up FR-D 3.0 Status Update

Wrap-Up FR-D 3.0 Status Update

Rolling Stock Complete

I just wanted to post a status update of my FR-D as I was taking pictures of the DIB275.

Adjusting the steering to where I want it to be has been tricky with the long sweeper arms, but I think I have it dialed in for now. I won't know until I add the electronics and take her to the track, but for now, she feels mechanically sound.

Yokomo DIB275

VIP Style

MSN-04 Sazabi - Mr. Boombastic.

Currently, and for at least the last year, Liberty Walk (LB*) and Rocket Bunny-converted bodies are very popular in the RC Drift Scene. Addiction has released several Rocket Bunny conversion kits for Yokomo and ABC Hobby S-series Nissans. HPI has just recently released their Rocket Bunny S14 Boss body. Tetsujin has their R35 and R37 Liberty Walk bodies (I own one of the R35 bodies, but need to finish it). This style is very fun and over the top, with wide-body kits with even wider wheel arches, swan-neck or duck-tail wings, and often super-saturated but matte finishes.

Another style, which I think deserves just as much attention, is the VIP or bippu style of cars. These are (but not always) four-door mid-size or larger sedans that have subtle body-work, tightly-tucked wheels often with noticeable negative camber, and a minimal amount of aftermarket body modifications, they are a different form of extreme. Traditionally, the paint colors associated with the bippu style of cars has been black, white, and darker shades of gray and blue. However, there has been a recent loosening of that palette so I decided to go with a metallic red as I'm keeping with my Gundam-themed cars. With it's large size and curves, I felt that the Zero Crown would be a great base for Char Aznable's MSN-04 Sazabi.


Shell - Yokomo Zero Crown

 Parts List -
  • Shell - Yokomo GOODYEAR Racing ZERO CROWN 275 (SD-ZCRLBS)
  • Paint - Tamiya Metallic Red (PS-15) backed with Gold (PS-13) backed with Black (PS-5)
  • Lights & Light Buckets - Yokomo Light Parts Zero Crown (SD-ZCRL)
  • Details - Wrap-Up Real 3D Front Grill Zero Crown (0023-01)
The paint job turned out rather good. However, the Yokomo decals had some trapped bubbles under then so they didn't want to sit flat where the windows meet the trim. I slit them slightly to release the trapped air and they look a lot better now. However, I plan on masking the trim and painting it or using some thin vinyl tape to better capture these details.

Chassis - Yokomo DIB275 w/ Grade Up 1-4 Kits

Parts List (Incomplete) - 
  • Chassis - Yokomo DIB V2 
  • Motor & ESC - Yokomo 8.5T Zero Brushless Motor w/ BL-PRO-3 ESC
  • Servo - Futaba S9551
  • Receiver - Futaba R2040E (No external antenna!)
  • Gyro - D-Like Guild n one Gyro
  • Wheels - Tetsujin Dahlia Super Rim
  • Tires - HPI Falken Azenis RT615 T-Drift Tire (Rear), 2 Bros (Front)
  • Misc - Usukani Front Knuckles
The chassis is currently what I'm driving at Kong's track while I work on my FR-D. It responds well to the use of throttle to kick the tail out and I'm really enjoying how it behaves around tight corners. I'm using the stock springs but with a slightly different shock placement. The motor and ESC wires need some trimming and I'm thinking about soldering bullet connectors to the end of the wires and to the motor to shorten things up. I might sleeve the wires as well, but for now, I need to drive it.